
Resonant Coils
All Tesla coils are nothing more than high frequency resonant transformers. This may sound confusing, but it is actually fairly easy to understand. In order for a Tesla coil to work correctly, an alternating or pulsed current must be put through a small primary coil. If the frequency put into primary coil matches the natural resonant frequency of the secondary coil, than a large voltage will be induced which is emitted from the coil top as an electrical discharge. With this in mind, one can imagine how crucial the design of the two coils can be.
SECONDARY COIL
The secondary coil of a Tesla coil is always larger than the primary coil, and typically consists of hundreds of turns of thin, enameled magnet wire around a cylindrical form. I say typically because there are one or two exceptions to this design rule. For one, high frequency vacuum tube Tesla coils (HFVTTC's) contain only a few tens of turns of thick copper wire or pipe (although their position as a true Tesla coil has been questioned). Also, some people wrap their secondary coils around conical forms, or even wind them completely flat. Nikola Tesla himself even experimented with these odd coil variations, which can be seen at right. For this article, though, the cylindrical variety of secondary coil will be the primary focus.
The wire used in the secondary coil is often copper magnet wire between 20-30AWG. Different wire gauges can yield different coil performances. For instance, thinner magnet wire may yield more turns for a given coil size, but will have a higher impedance and resistance which may limit the coils output. Thicker wire gauges are good for larger coils, and have a lower impedance, but suffer from fewer windings per inch of coil, which can lead to a higher resonant frequency for a given coil height.
Any wire used in the secondary coil must be enameled in order to prevent the windings from shorting. Additionally, some people choose to coat their secondary coil in a wax, varnish, or resin to help prevent corona loss and undesired arcing from the secondary to the primary. This is not crucial for small coils, but is recommended for larger coils.
The cylindrical coil form traditionally used by most coilers is a PVC or acrylic pipe. Some people choose sand their pipe to remove any ink on the surface, which may be conductive and present issues in large, high-power coils. Cardboard is also a common coil form material, especially for small coils. Almost any non-conductive material can be used as a coil form, provided it is rigid enough to support the wire being wound onto it. When it comes to actually winding the coil, it can either be done by hand (a method I have always employed) or with the help of a "jig" (seen at right). A winding jig basically uses a motor (hobbyists seem found of using electric drills) to rotate the coil, pulling magnet wire along and essentially winding itself. Here is a great video discussing coil winding jigs.
The secondary coil's optimal height seems to be something that confuses most people. Contrary to popular belief, a thin, tall secondary is NOT optimal. Rather, a short, fat secondary is preferable. Not only does it look more appealing to the eyes of most, it also allows the secondary to have greater contact with the primary coil's magnetic field, resulting in longer discharges from a smaller coil.
PRIMARY COIL
Primary coils are one of the most critical parts of a Tesla coil to design correctly, since they form the resonant tank circuit with the capacitor bank. The primary coil's inductance, teamed with the capacitance of the capacitor bank, determines the resonant frequency of the coil. Roughly speaking, the number of turns on a given coil impacts what the inductance will be. Coilers often take advantage of this fact and design their primary coils with the ability to be tapped along the individual turns, so the coil can be tuned to the proper resonant frequency by changing the primary inductance.
Primaries are often wound with thick copper wire (ordinary 16AWG insulated appliance wire works fine for small and medium coils) or copper tubing. Copper tubing is a classic option, not only for it's professional look, but also because it is easily tappable and can handle hundreds of amps of current. The main downfall of copper tubing is it's rigid nature and tendency to kink when wound at too tight of an angle. Stranded copper wire is another good option, although changing connection points on an insulated copper wire is somewhat more tricky. The main upside to copper wire is the flexibility and lower cost per foot (even with heavier gauges like 12AWG).
The shape of a primary coil can vary quite a bit. Some people opt for a helical primary that matches the secondary coil and fits nicely around it. Others go for "pancake", conical, or even futuristic, half-donut shapes. In general, the more helical a primary coil is, the higher the inductance and coupling will be. Flat "pancake" coils offer lower inductance values, but may fall victim to more secondary coil arc-overs. Helical coils aren't hit as often by stray streamers, but may still be zapped by sparks racing along the coil sides, if the coupling is too high. A common fix for medium and large coils is to add a grounded "strike rail" above or near the primary coil. That way, when a Tesla coil arc comes too close to the primary coil, it should just hit the strike rail instead.
COUPLING
Aside from coil tuning, coupling is probably one of the most crucial aspects of building a reasonable Tesla coil. In simple terms, coupling is basically a measure of how much electromagnetic field is shared by two coils. For example, a coupling coefficient of 1 means 100% of the electromagnetic field passes through the coils, allowing the most energy transfer possible between them. While this may sound desirable, it's actually not in a Tesla coil. Spark gap Tesla coils must have a coupling coefficient less than 0.2. The effect of exceeding 0.2 can be seen in the image at right. As the coupling approaches or exceeds 0.2, corona discharge will start to develop between the coils. If the coupling goes too high, inter-coil arc may occur, damaging the circuit and possible ruining the secondary.
To check the coupling of your coils, it is recommended that you input the designs into a Tesla coil design program (like JavaTC), where the coupling (and even tuning) can be calculated for you. To increase the coil coupling, one can simply raise the primary coil closer to the secondary coil's center (or decrease its diameter, although this will alter the primary's inductance and therefore the coil tuning). It is a good idea to experiment with your coil's coupling once it is assembled, since the optimal coupling isn't always what a computer recommends!


Toploads
.jpg)

.jpg)
.jpg)
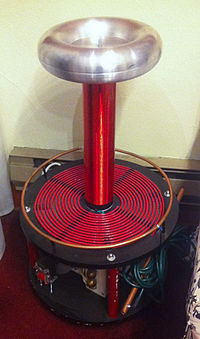
Toploads have two main functions in a Tesla coil: they allow higher voltages to be developed and they lower the secondary's resonant frequency. Essentially, toploads act like high voltage capacitors. A smooth, rounded topload will store energy and prevent electricity from leaking away until the voltage is high enough (leading to longer sparks). Additionally, it will introduce some capacitance (usually a few picofarads) that, when combined with the weak, parasitic capacitance of the secondary, will result in a lower resonant frequency.
The effect of using a topload is actually rather pronounced, but is sadly overlooked by some beginners, so I feel it is best to give a real-life example. I performed a number of tests on my own coil (a triple-MOT, rotary gap coil with a 36"x4.25" secondary), both with and without toploads (tuning was accounted for). With a 22" diameter toroidal topload attached, the maximum spark length was over 36 inches (a respectable size discharge for this coil size). With the topload removed, however, the discharge size dropped to under 18 inches. The big takeaway: big toploads usually lead to big sparks!
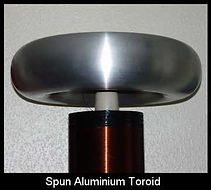
There are a number of different topload shapes that people tend to use. By far, the most popular is the toroid (aka, donut). Spun aluminum has the most professional look, but the prices can get pretty insane (over $50 for a single 8" toroid!). A common at-home method of getting a decent-size toroid is to buy some aluminum dryer hose (usually under $10 at most stores) and wrap it around into a donut shape. Another approach is to form the basic shape you want out of common materials (foam, cardboard, wood, etc.) and cover it in aluminum tape. Click here for an excellent video demonstrating this technique!
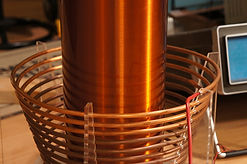
Another method of getting a toroidal-type topload is to use a number of spaced copper or aluminum rings (as shown at left). This approach works great, if you have access to copper tubing or thick-gauge, solid-core wire.
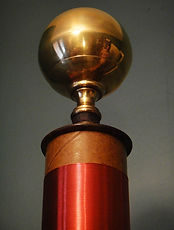
The other main topload shape you run into is the sphere. Again, spheres made from solid aluminum or copper are quite expensive. Fortunately, alternatives do exist! For small coils, metal door knobs actually work really well. Another common DIY sphere can be made by attaching two metal salad or mixing bowls together. You could also simply do what was mentioned above again, and simply cover a sphere of some kind with aluminum tape or foil.
So, is there any real differences between these toploads' performance? Surprisingly, there is! While spark size doesn't tend to change that much, coils with spherical toploads do tend to suffer from more arc-overs, racing sparks, and primary coil strikes. Conversely, toroidal toploads tend to function better, and typically receive fewer inter-coil discharges.